Well, after about 3 years of want, lust, and unhealthy desire, I finally made a commitment to her and bought my darling Lowe boat a Garmin Livescope!
All jokes aside, I managed to save up the money and while I was at it, I figured I'd address some of my boat electrical issues alongside the install.
I was able to find the Garmin 93SV unit bundled with the Livescope black box and transducer as package deal from mygreenoutdoors.com. Kevin is the owner and made an impression by actually texting me and carrying out a conversation about the system when I was shopping around. Garmin marked the chartplotter units down to $599 for the holidays and the $1,400 Livescope system had a $200 mail-in rebate, so it was a deal I couldn't pass up.
I decided while I was at it, I'd rewire the electrical circuits in the boat. Since I bought the boat, all electronics were wired to the cranking battery. It came this way from the factory and I added to the circuit on the cranking battery when I installed the Lowrance units previously. This resulted in having a significant amp draw on the cranking battery and I'm constantly having issues running the cranking battery down when using electronics on the water.
I decided to install a dedicated battery for all electronics. In doing so, I wanted to also install a new fuse box to clean up the wiring. It's a birdnest from the factory.
I decided to put in this 12 circuit fuse box.
I bought a new Diehard Gold 29MH for my electronics battery. This massive battery has a 210 minute reserve, which was my driving reason for buying it. Finding a place for the new battery was a challenge. There isn't any more room in the back of the boat and I didn't need the additional weight in the rear. I found that there was a hollow spot to the starboard of the front livewell that was directly in front of the steering console. I cut open the firewall from the front storage compartment and the hollow area was the perfect size and shape to house this battery. Additionally, the location in relation to the steering console made it perfect for running wire to the console.
The new Garmin black box is really the brains and processor of the Livescope system. I needed a safe place to mount this that was out of the way and secure. I found that the deck stiffening struts under the front deck made a perfect place for a shelf, so I cut a piece of lightweight aluminum to fit the area and mounted the black box.
Next, I mounted the screen. I made a mounting bracket that lifted the screen up and over the trolling metal foot well. I think installed a ram mount and mounted the screen. I was able to pass the power wires through the existing plastic panel where the trolling motor plugs in and feed the transducer cable under the foot pedal. I installed the 54UHD transducer for side/down imaging and traditional sonar on the trolling motor.


Now that the major components were in place, I began the rewiring process. I removed all electrical circuits off the factory fuse box and carefully labeled them all. I installed the new fuse box under the console and reinstalled all circuits to the new, labeled fuse box. Any circuits that needed new wire were ran with 14 AWG. I made sure that all holes drilled through the boat were lined with protective rubber grommets. 4 AWG battery leads were installed between the fuse box and the battery. I also installed a new 5 amp on board charger. I didn't want the cord getting in the way, so hid it behind a panel and wired a female recessed receptacle so I could simple plug in an extension cord when ready to charge the battery. This installation was slick. Once everything was wired, I tested all the switches and circuits and everything worked perfectly.


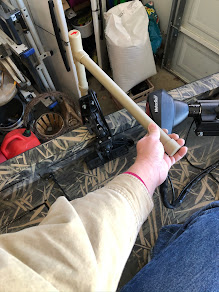
Now that all the wiring was finished, all that was left was to install the Livescope transducer. I wanted the transducer pole mounted such that it could be independently pointed and was not reliant on trolling motor direction. I used 1" CPVC for the pole mount. I used reducers to step down to a 3/4" PEX and slid the 3/4" PEX through greased 1" to act as a sleeve for the swivel motion. I epoxied the PEX connections. I installed a 1" coupling to the bottom of the pole because the Livescope perspective mount bracket fit that coupling diameter perfectly. Once all assembled, I sanded the CPVC and applied paint. I used a couple Scotty ball mounts and a couple U-bolts to attached the pole to the boat. I made a vinyl arrow sticker to mark the direction the transducer is pointing. Below is the final result.


I think with every expense accounted for, I have about $2,700 in the complete finished install. I'm very pleased with the entire project and it came out very clean and professional. Now to get it in the water and try it out!


